
When first beginning your sewing journey, sewing patterns can be one of the biggest deterrents. There’s a lot of information included in every pattern, and depending on where you’re getting it from, each one can be slightly different.
So, we’re going to go over what’s generally included in a sewing pattern, where all the information is located on commercial sewing patterns as well as indie patterns, and what to do when you come across a step that doesn’t make sense.
Types of Sewing Patterns
The main two types of sewing patterns are commercial and indie patterns. Commercial patterns are patterns that generally come in a pattern envelope and are made by companies such as Butterwick, McCall, Simplicity, and many more. These are the types of patterns that are considered higher-end and always come with a lot of information because of the resources they have to dedicate to creating a pattern. Indie patterns, which is what my patterns are, are made by individuals. Because of this, they are more nuanced in how much information comes with the pattern, such as sizing, availability, price, if there’s instructions, and more, so it’s really important to double check what information comes with a pattern before you buy it. But this doesn’t mean indie patterns are worse than commercial! Some can be much better or much worse; it all just comes down to who’s making the pattern. Another common trait of indie sewing patterns is that they will normally only be available as a pdf download or a projector file.
Pdf sewing patterns will come with a file that you can download to your computer, where you can then print the pattern and tape it together in order to get the paper pattern. It has its pro’s and con’s, such as being easier to trace because of the thicker paper and taking longer to complete a project due to that extra step that preprinted patterns don’t have to deal with, respectively. And projector file sewing patterns (they’re normally a bonus file that comes with some pdf patterns) allow you to project the pattern directly onto your fabric without any paper waste or dealing with physical storage. This option also comes with the hassle of making sure the projector is aligned correctly before cutting to ensure it projects the pattern to the correct scale and size.
The good news is that there are so many options when it comes to patterns that there’s more than one option to fit everyone’s different workflows. For example, a lot of free sewing patterns don’t come with written instructions—just the pattern and a video tutorial. This can be perfect for someone who’s just starting out by allowing them to save money and avoid the headache of learning written instructions for a little while longer while they learn about the hobby. It can be really difficult to understand written instructions if you’ve never seen the step being acted out before or what they’re even talking about. That being said, if you ever do come across a step on a written pattern instruction that doesn’t make sense, you can always look up tutorials on YouTube just for that very specific topic or task.
With some of the most common types of sewing patterns out of the way, let’s go over what’s included in a sewing pattern when you buy one.
What’s Included and Where It’s Located
To start, there is a lot of valuable information on the pattern envelope you should look at before buying or starting a sewing pattern.
Front of the Envelope:
– Company name
– Imagery of what the finished piece looks like (could be a photo or illustration)
– Pattern number
– Size
– Price
– Pattern name
Back of the Envelope:
– Number of pattern pieces included
– Technical drawings of project options (such as three variations of the same dress) and/or technical drawings of the pattern pieces
– Pattern description (what type of garment it is)
– Fabric types that are recommended for the project
– Notions (buttons, zippers, ribbons, etc.) needed to complete the project
– Body measurements corresponding to the size of the pattern you should cut out
– Yardage, or how much fabric is needed to complete each garment depending on the size guide
– Finished garment measurements
– Symbol Guide
Each company does their envelopes a little differently, so not all of these will be included on every pattern envelope, and sometimes they’ll switch whether the information will be on the front or the back, but these are pretty standard. The location of the information on the envelope might change too (especially when switching from modern patterns to vintage patterns or vice versa), so focus more on learning what the information means and looks like than its location on the page.


When it comes to indie patterns, most of this information will be on the product listing instead of a pattern envelope. Sometimes this information will be at the end of the product photos, or it will be in the product description. This information should be reviewable before you buy the pattern, especially the size range. They should also indicate whether their pattern comes with written instructions, video tutorials, or no instructions at all.

Reading Commercial Patterns
Commercial patterns come with a large sheet of paper that unfolds to show the instructions and additional information similar to what’s on the pattern envelope. They’re more limited in how detailed the pattern instructions can be due to the limited amount of space available on a physically printed piece of paper, and this can sometimes make the illustrations and written instructions hard to follow. On the other hand, commercial patterns generally have better additional information compared to their indie counterparts because there’s a very specific formula that they follow to ensure all the proper information is being conveyed, while indie patterns might have information spread on their website or in videos instead of being repeated on each individual pattern.
When first opening up the pattern instructions, it can be quite overwhelming with all the different information crammed together in what might initially look very chaotic, but it’s easy to follow once you know what you’re looking at.
When reading a printed pattern instruction page, you start at the top left of page 1 and read down the column before starting back up at the top of the next column and repeating the process through both the front and the back page.
Page 1

Page 2

Let’s go through each section one by one. Also note, at the very top left of the page, it lists which page is which under the pattern number.

First Section
The first section shows the different garment options that are included with this pattern once again. This information is the same as on the envelope, but it helps to have the illustration and the letters that categorize the patterns in the upcoming sections.
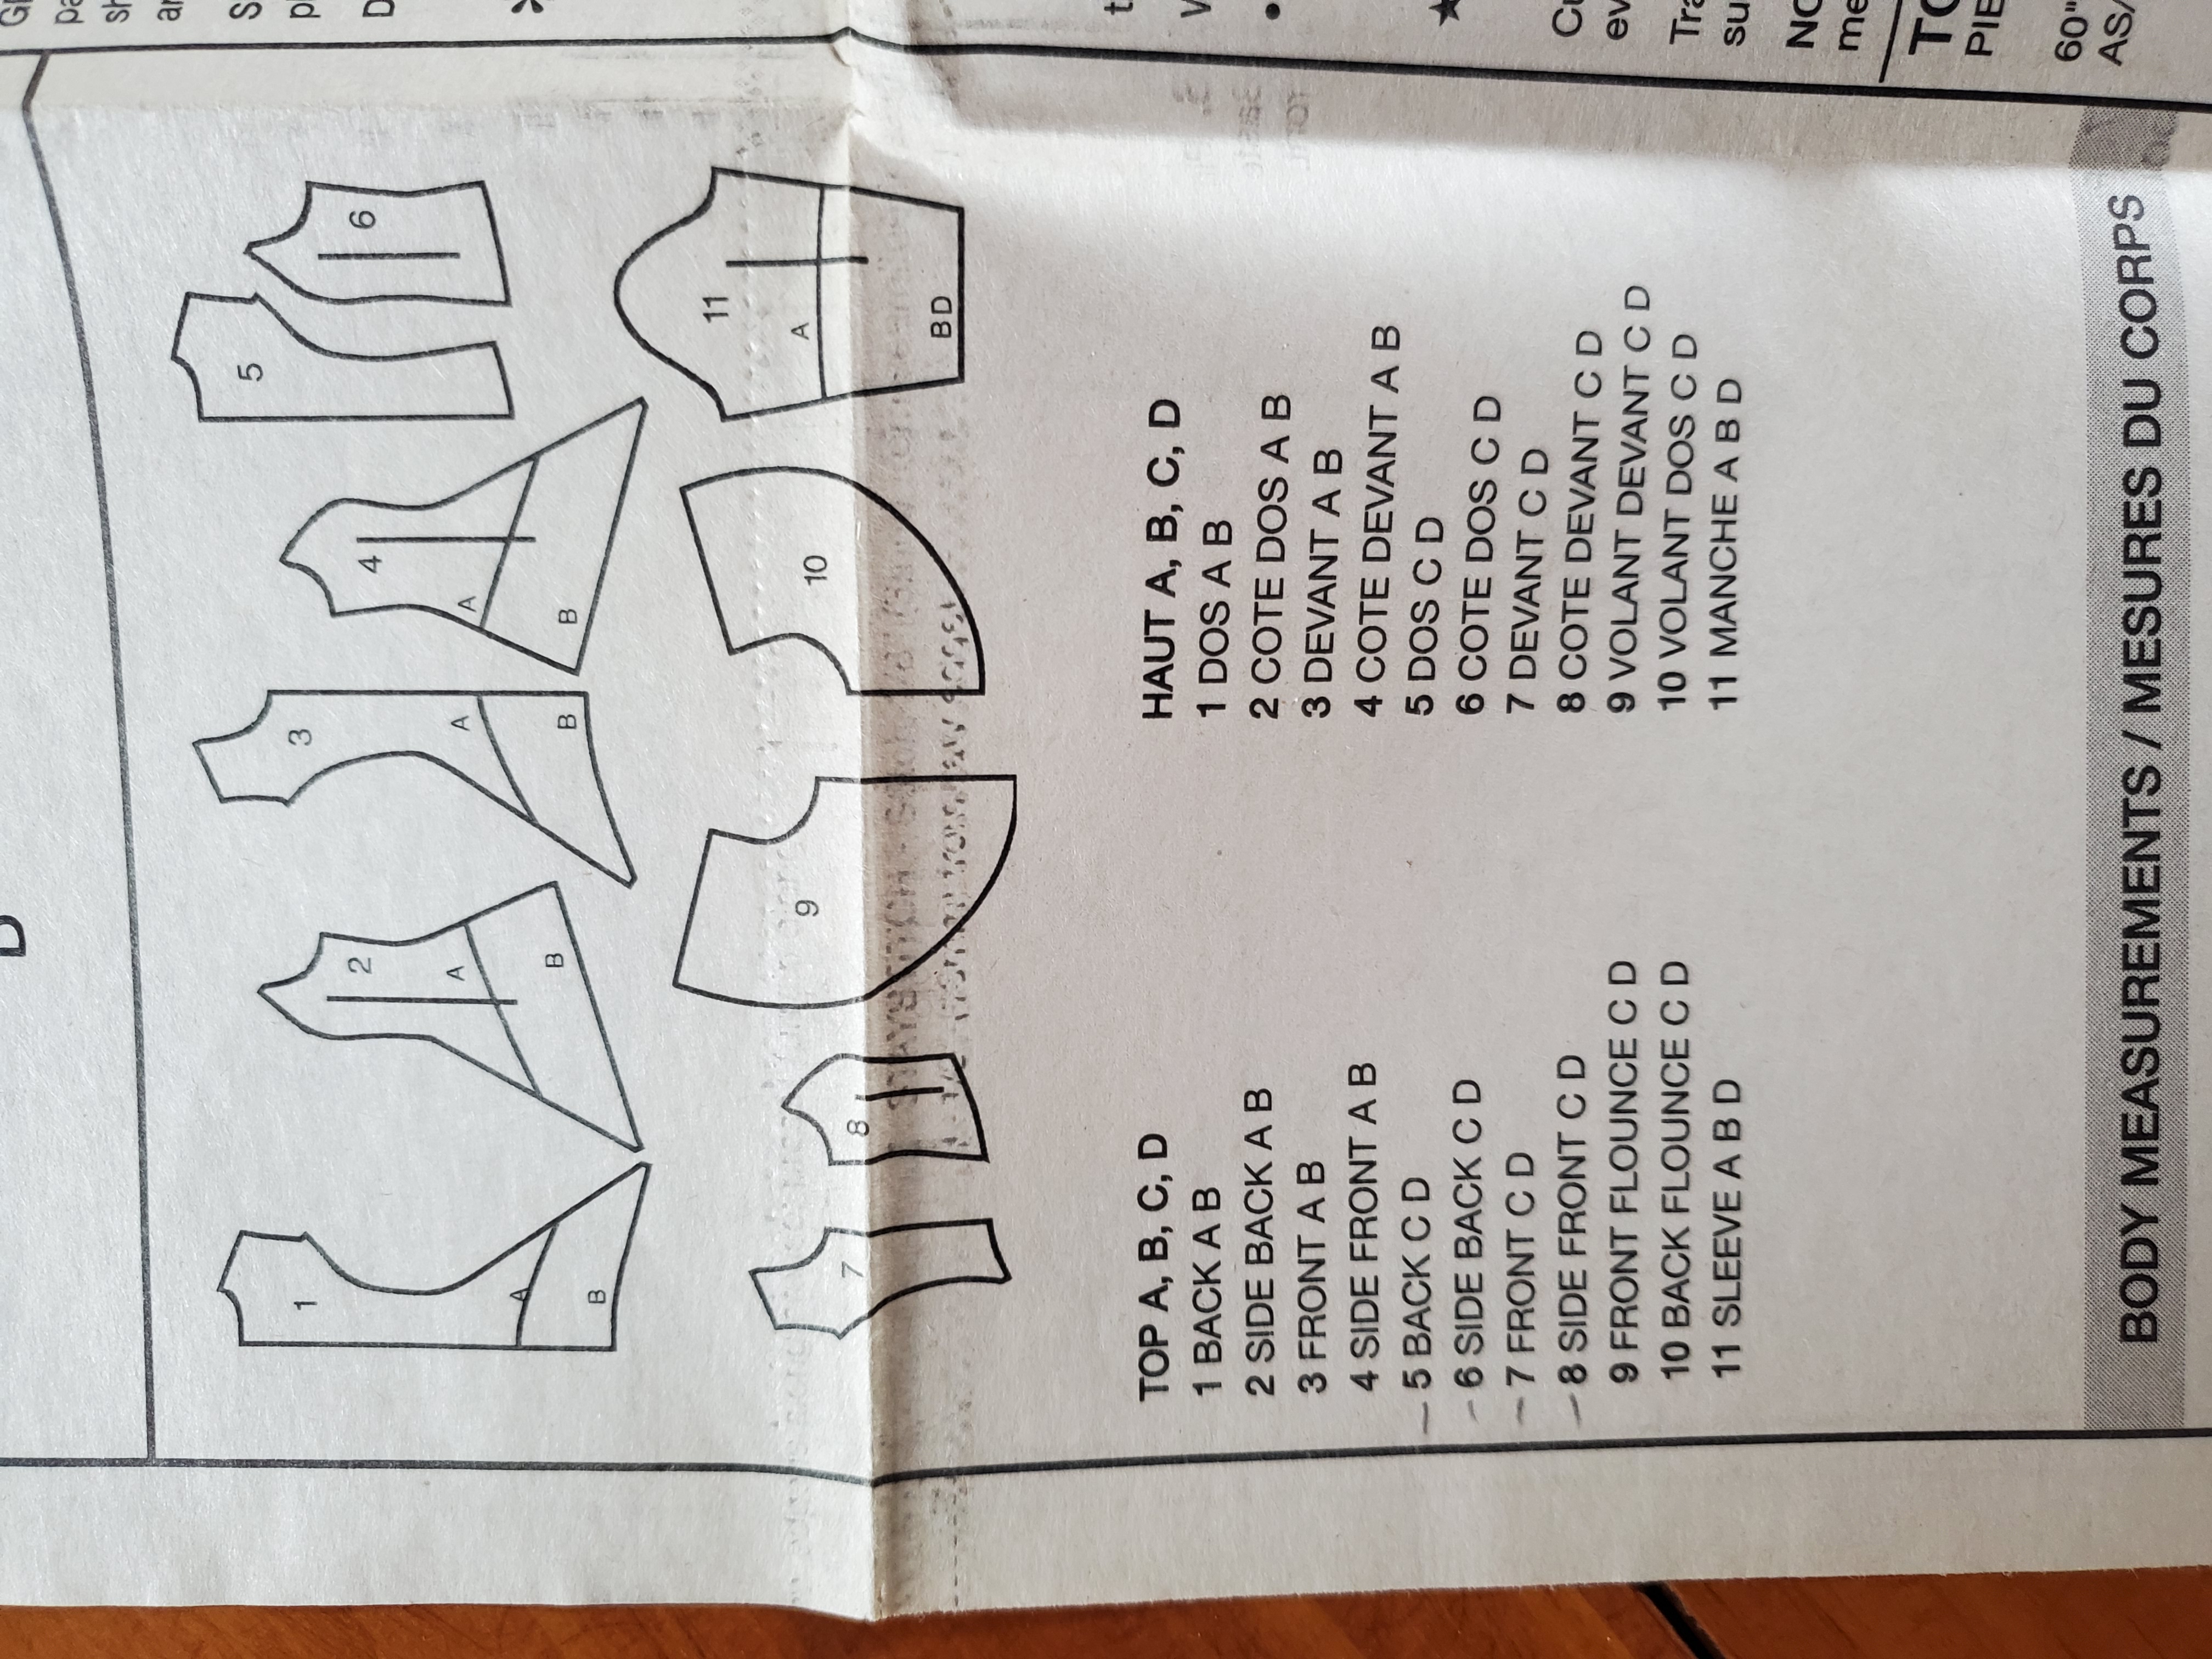
Section 2
This section shows all the pattern pieces included in the pattern as well as the numbers that correspond to the physical pattern pieces, the names of the pattern pieces, and which pattern pieces belong to which garment in the first section. It’s helpful to have this smaller scale to reference while cutting out the pattern pieces and sewing the pieces together, as the larger pattern pieces can sometimes be hard to keep track of otherwise. So for example, if I wanted to make garment C (from the first section), I would find all the pieces that have C listed in the left column. In this case, I would need pattern pieces 5, 6, 7, 8, 9, and 10 to complete garment C. These numbers will correspond to the numbers on the actual pattern, so they are easy to find when they are taken out of the envelope.
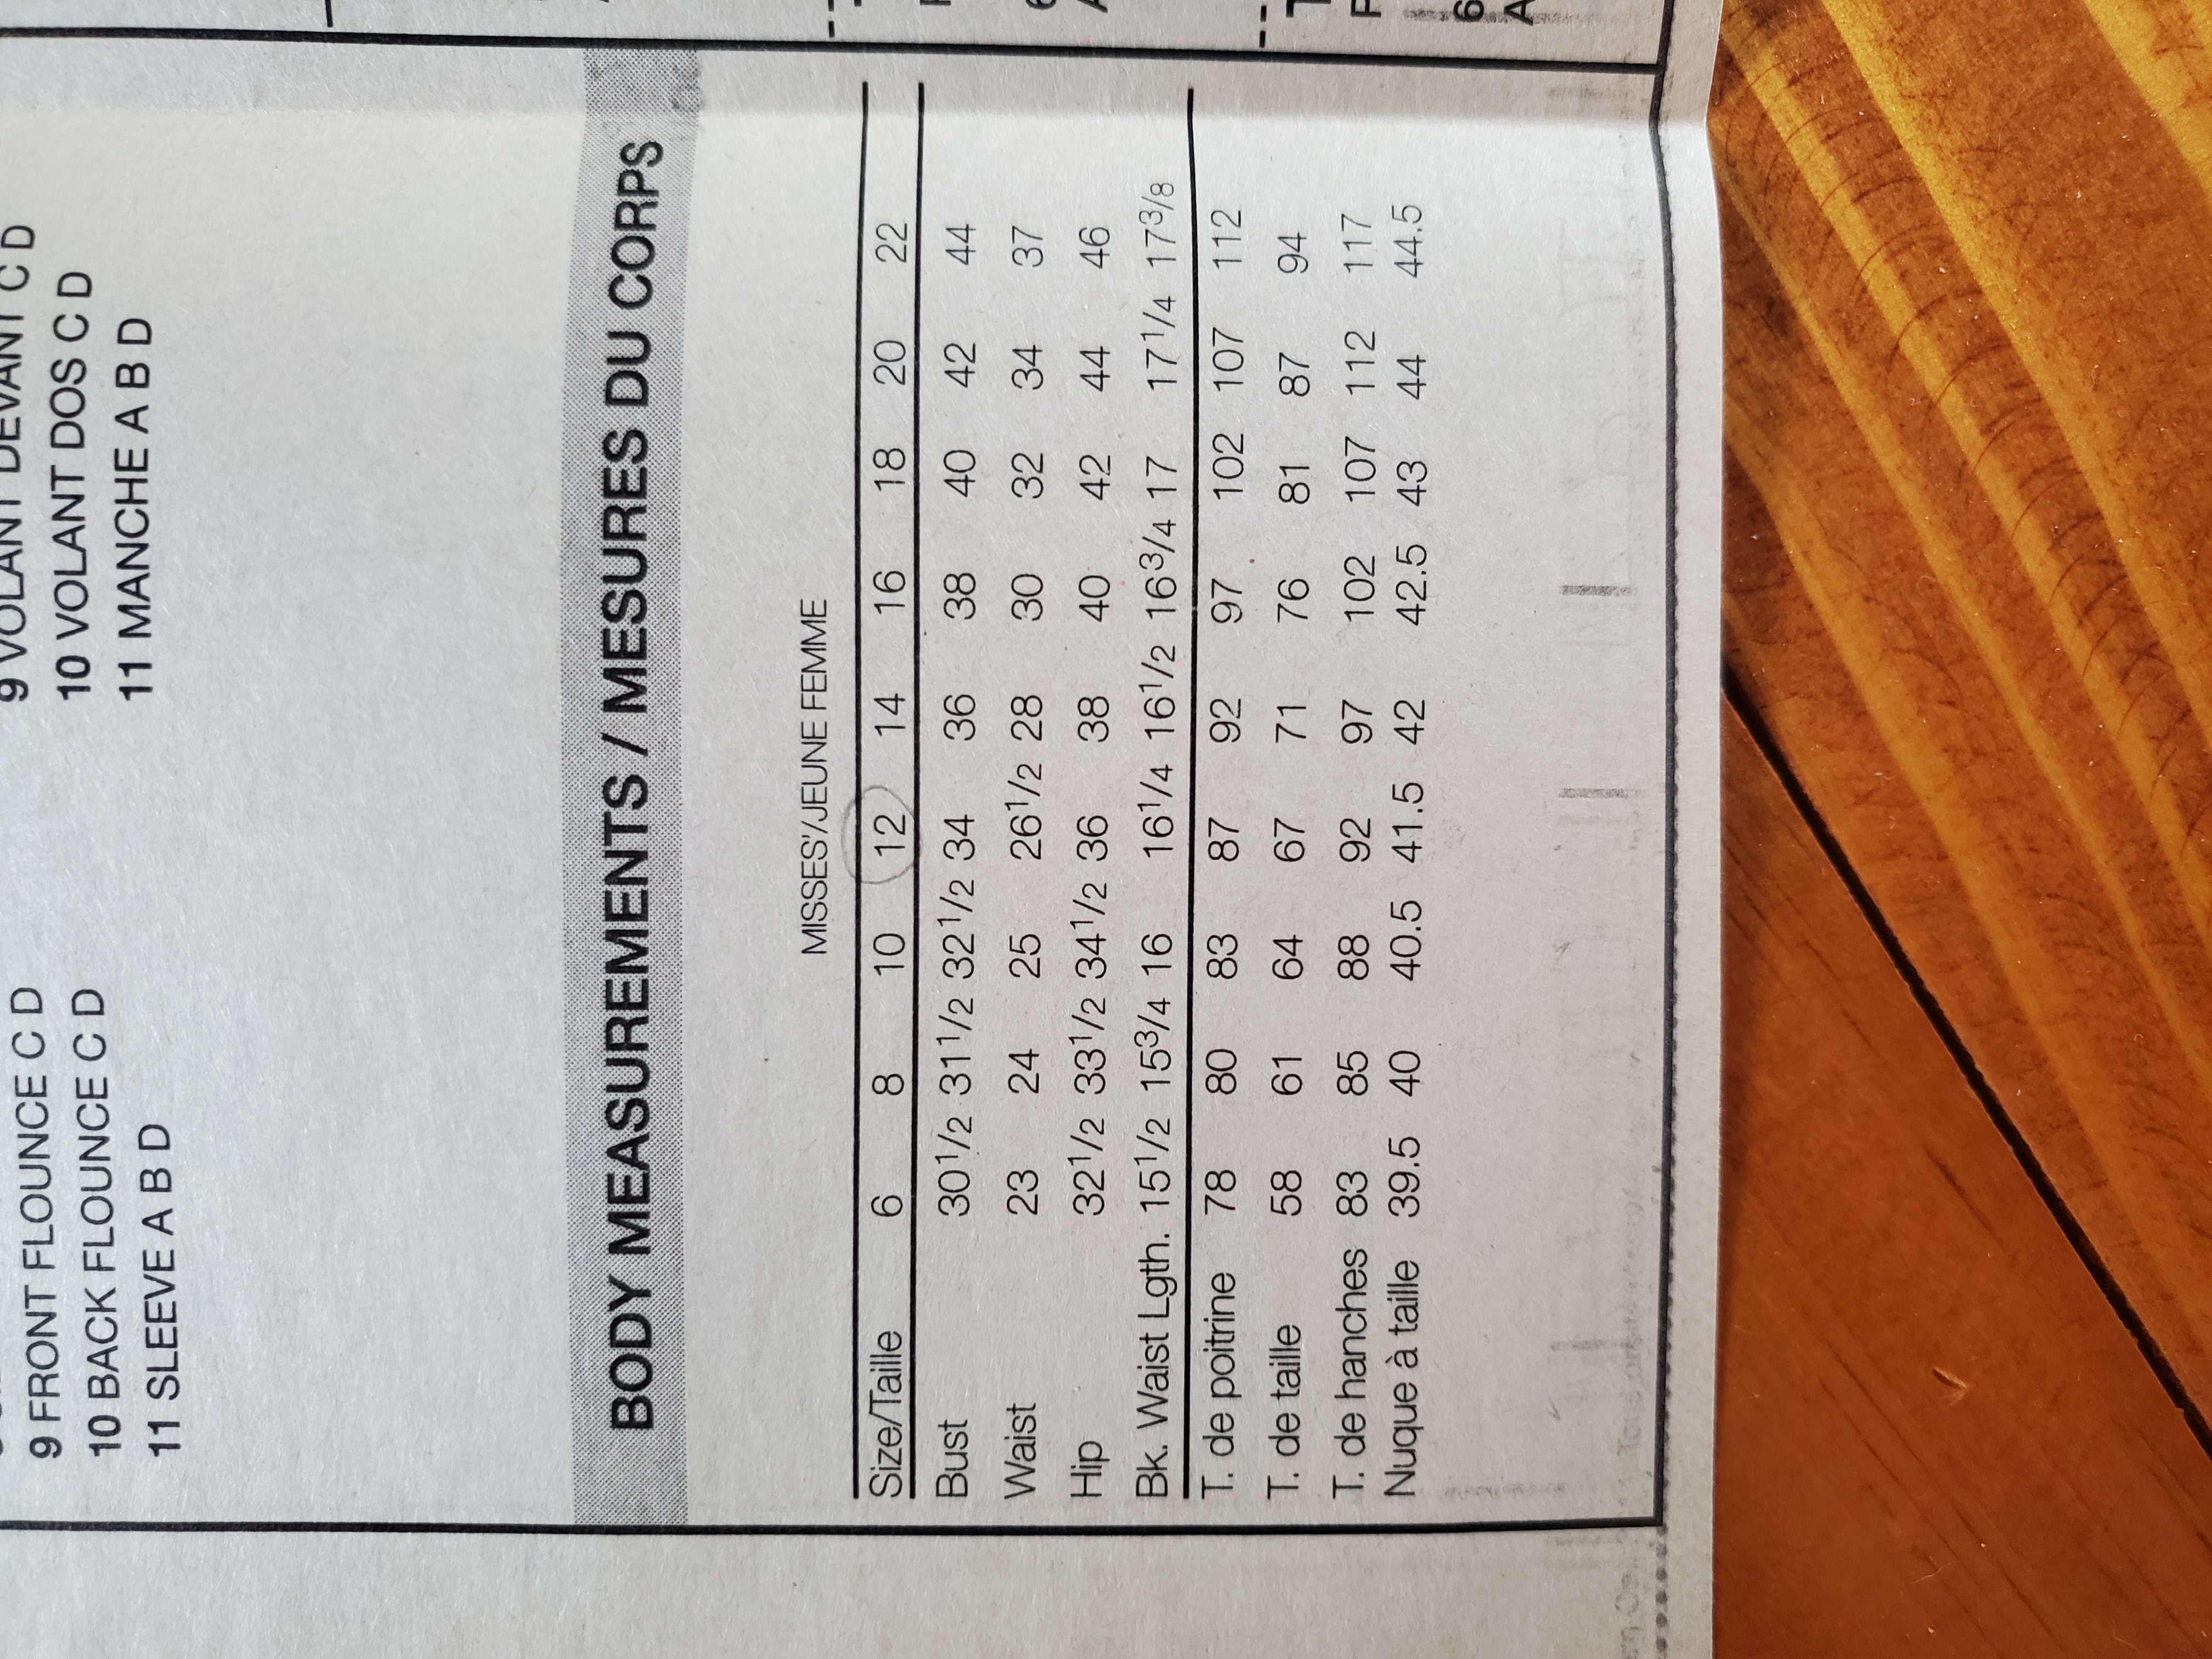
Section 3 Body Measurements
 Section 3 is another repeat from the pattern envelope, and it tells you what size to cut out of the pattern. The pattern pieces have staggered lines on different sections that need to be cut to size and other sections that are the same no matter what size you’re cutting out. Take the necessary measurements for the pattern and find the size that is closest to your measurements. If there’s a big difference between your measurements, say, for example, your bust is a size 16 but your waist is a size 20, do some research into sizing up sections of the pattern before you get started. For example, most patterns will have a lengthen/shorten line for parts of the pattern that most often need adjustments. It’s also beneficial to make a mock-up before cutting into your good fabric, as the general sizing isn’t always suited to a lot of different body types. It’s impossible to accommodate everyone, so the pattern makers do their best to fit a general range, but it’s a far from perfect solution, so it’s important to understand these measurements and how they work best for you as an individual. Another quick tip I recommend: if you’re scared to cut your pattern paper to the wrong size, trace the size you think you need on tracing paper. This step takes a bit longer than just cutting it out, but it preserves the original pattern in case you ever need to make a bigger size, make alterations that you’re not confident about, or even use the other sizes for friends and family. It can take some of the fear out of making a mistake.
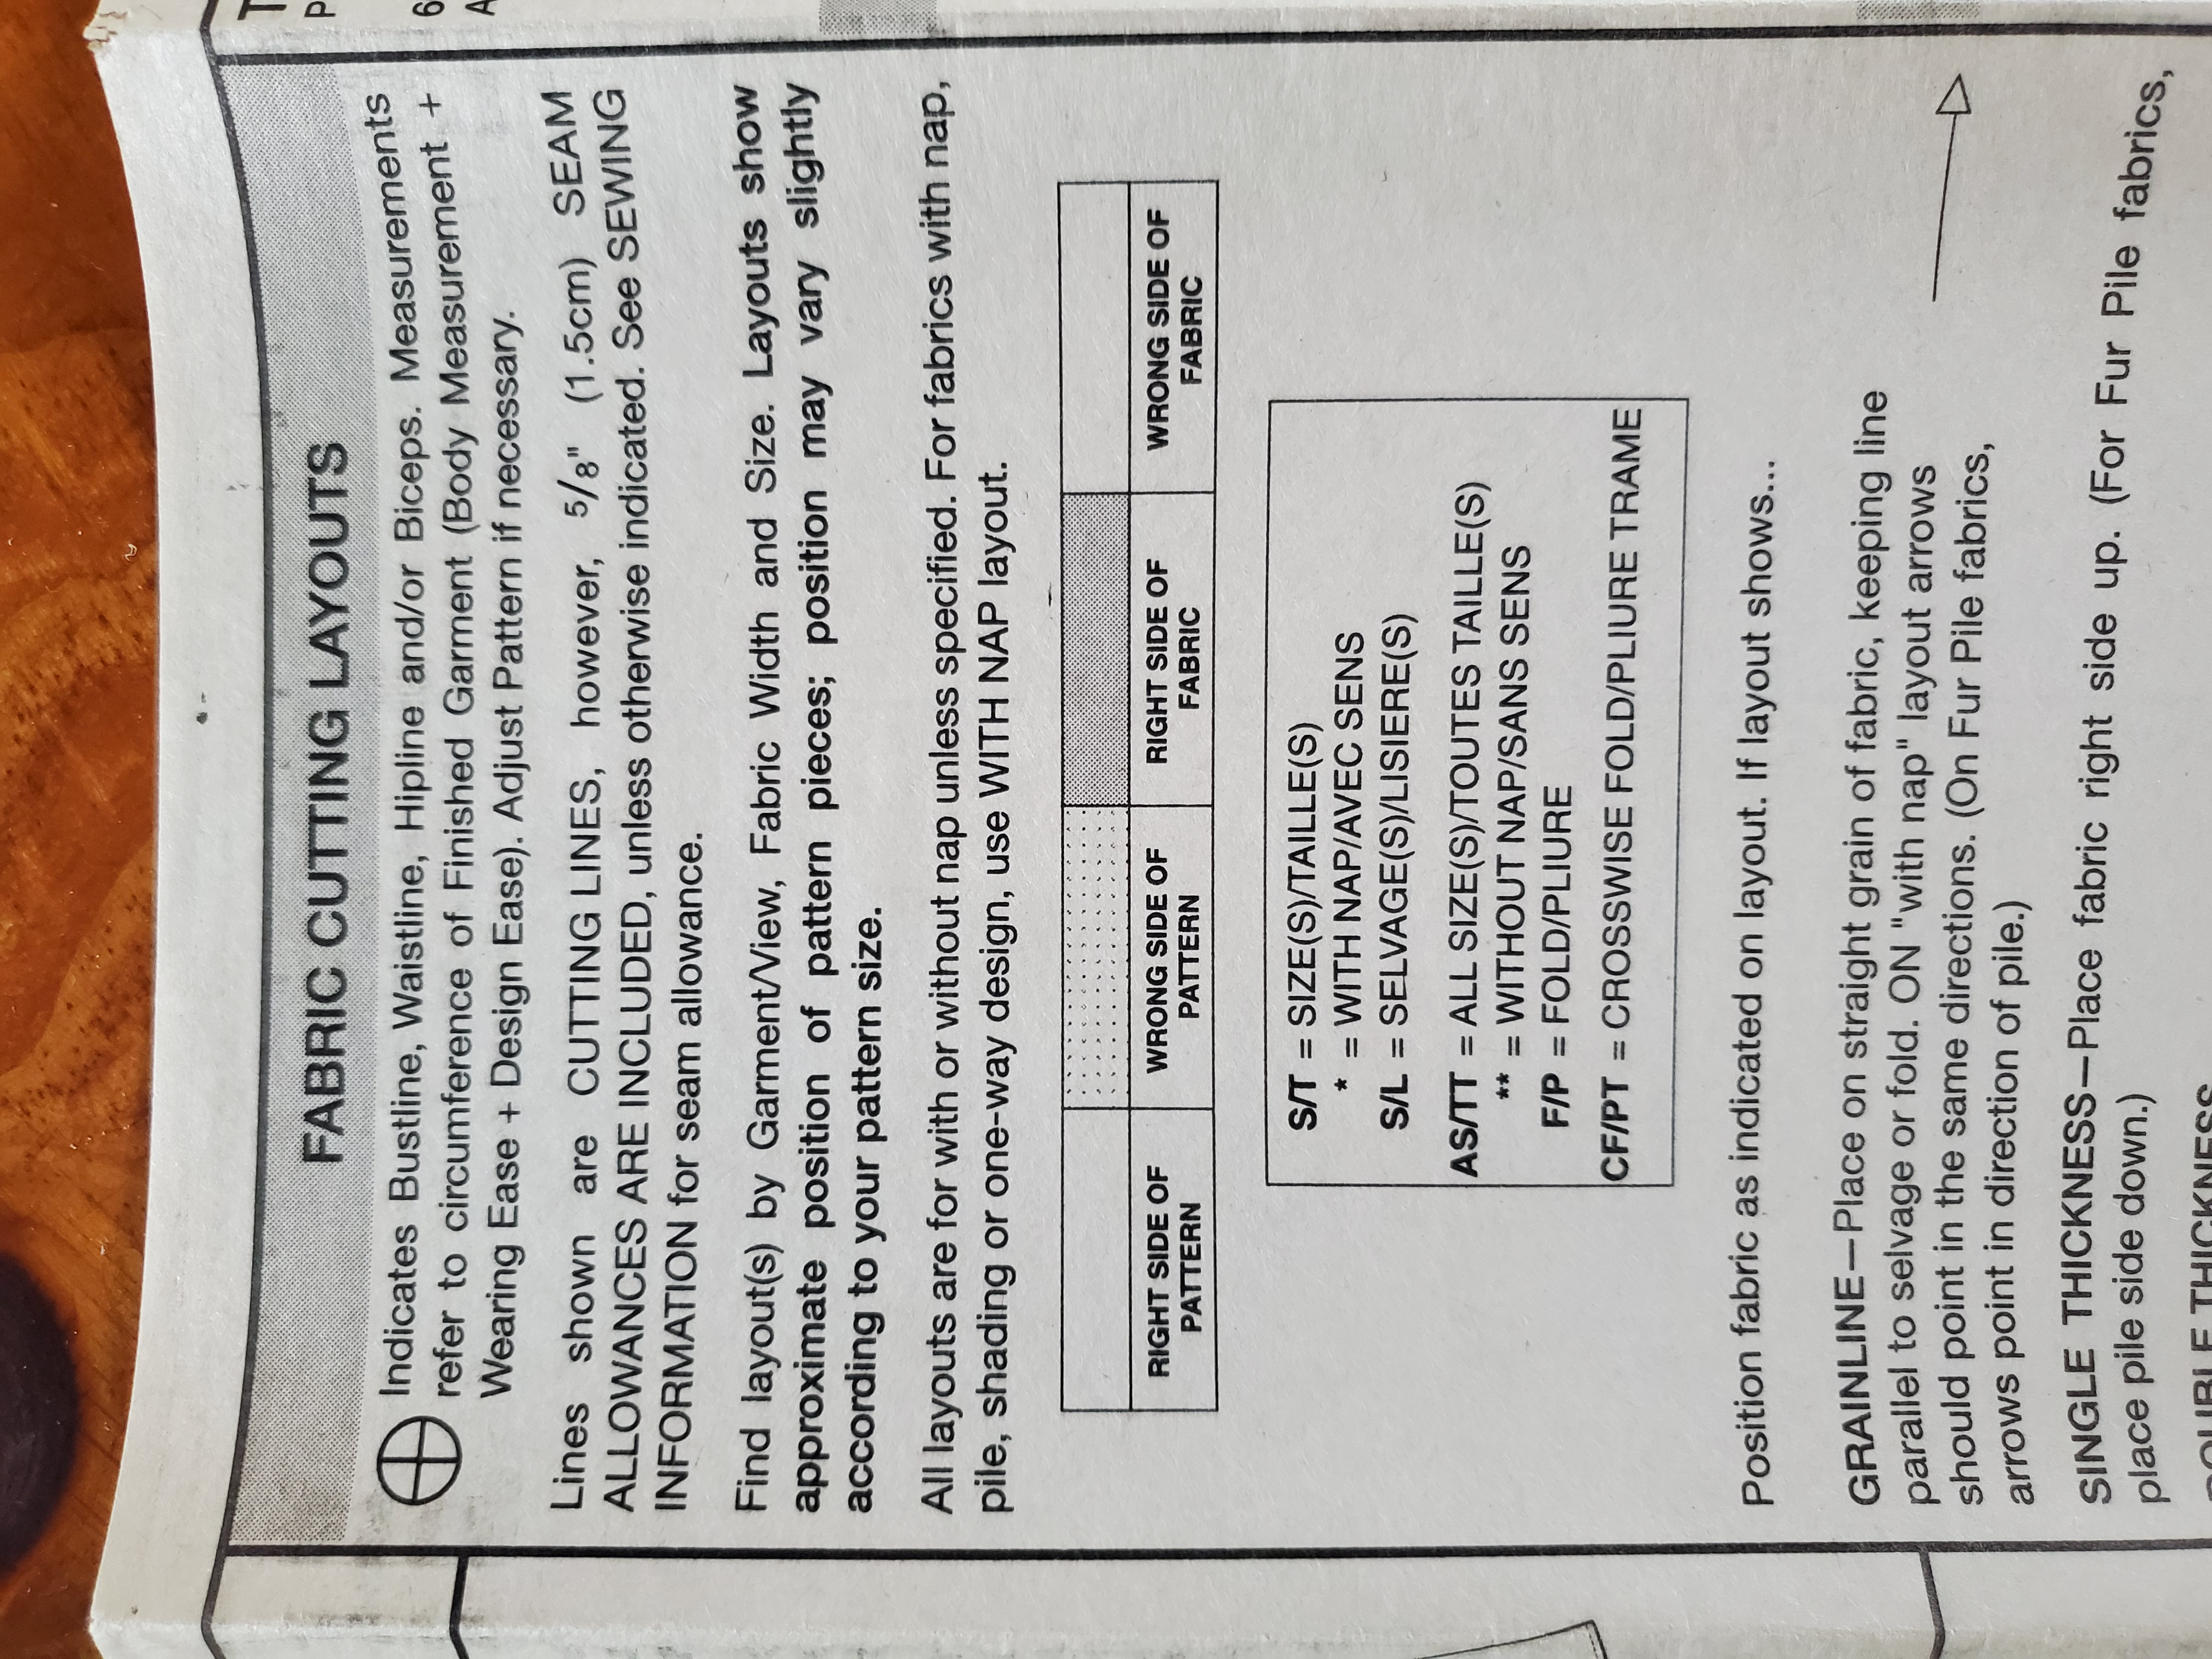
Section 4.1 Fabric Cutting Layouts
 Section 4 is pretty long, so we’ll break it up into multiple parts. This section is where you will find the information needed to understand the illustrations in the instruction section and how they recommend cutting out the pattern pieces on your fabric. This part of Section 4 specifically goes over generally needed information in order to read the fabric layout, a guide on which side of the fabric they are showing, the symbols they are using, and their meaning.Â
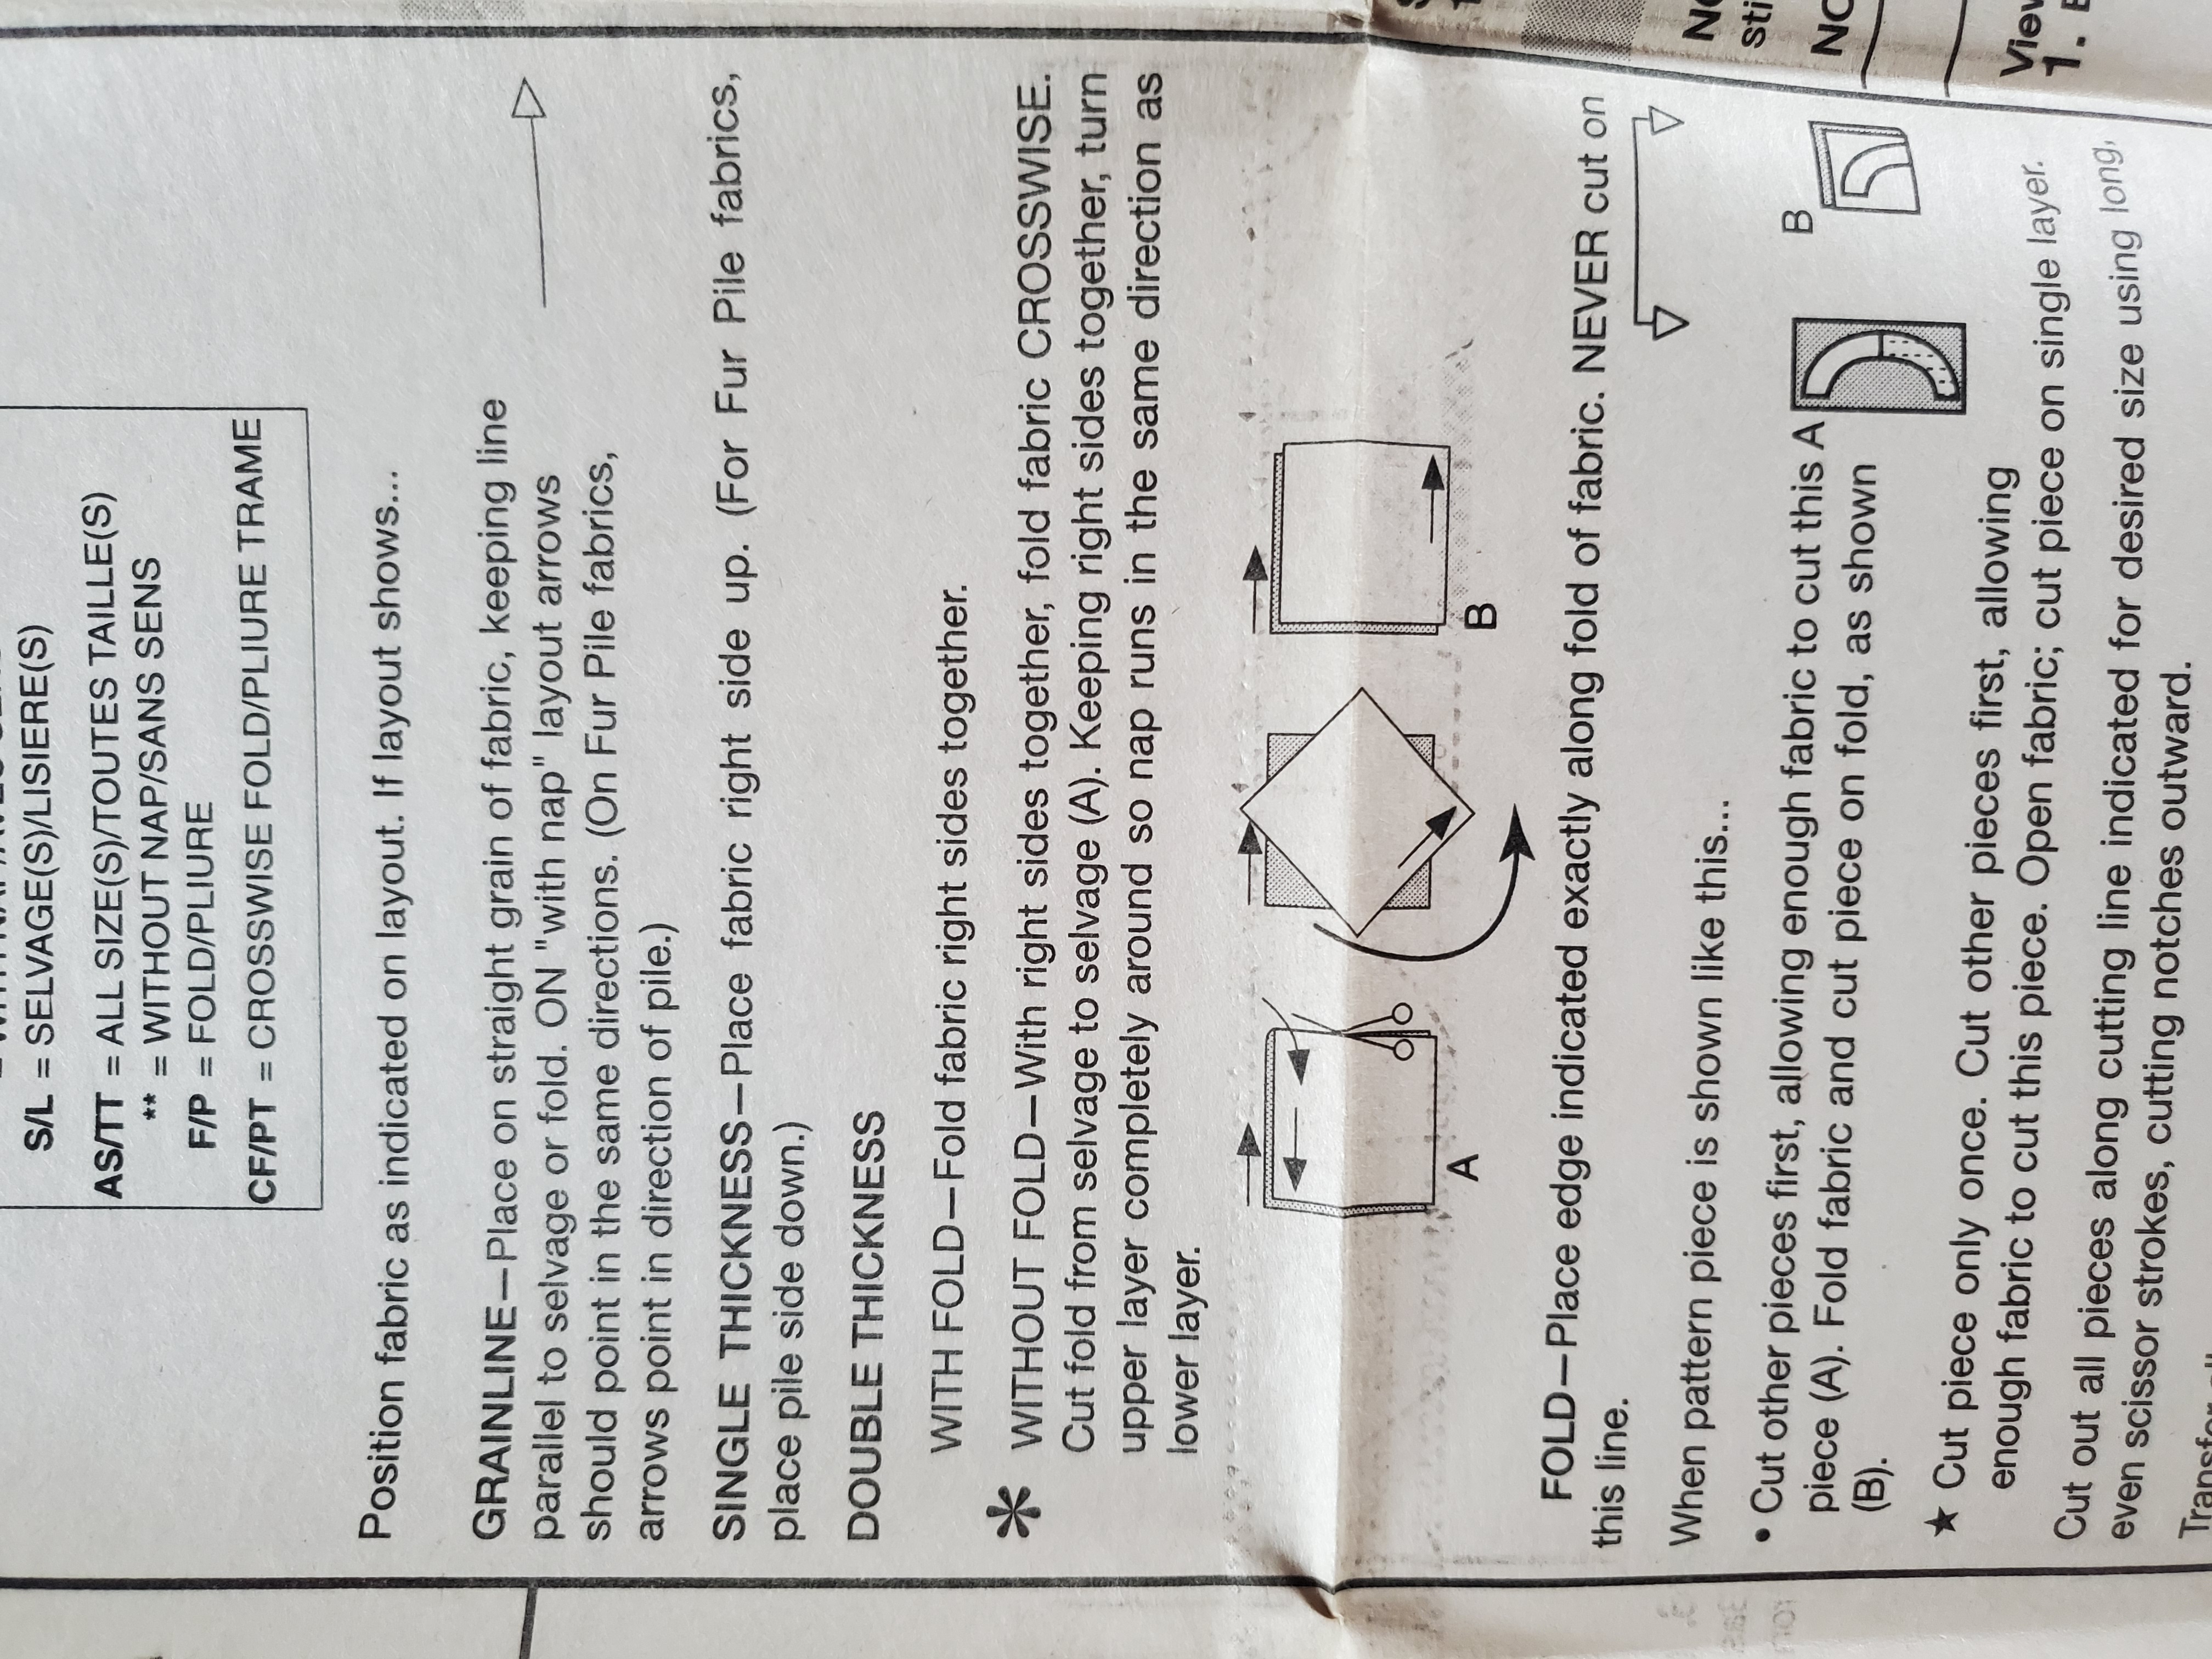
Section 4.2 Fabric Cutting Layouts
Section 4.2 lists important words to know and what they mean in the guiding illustrations and instructions on how to trace and cut out the pattern pieces on the fabric.Â
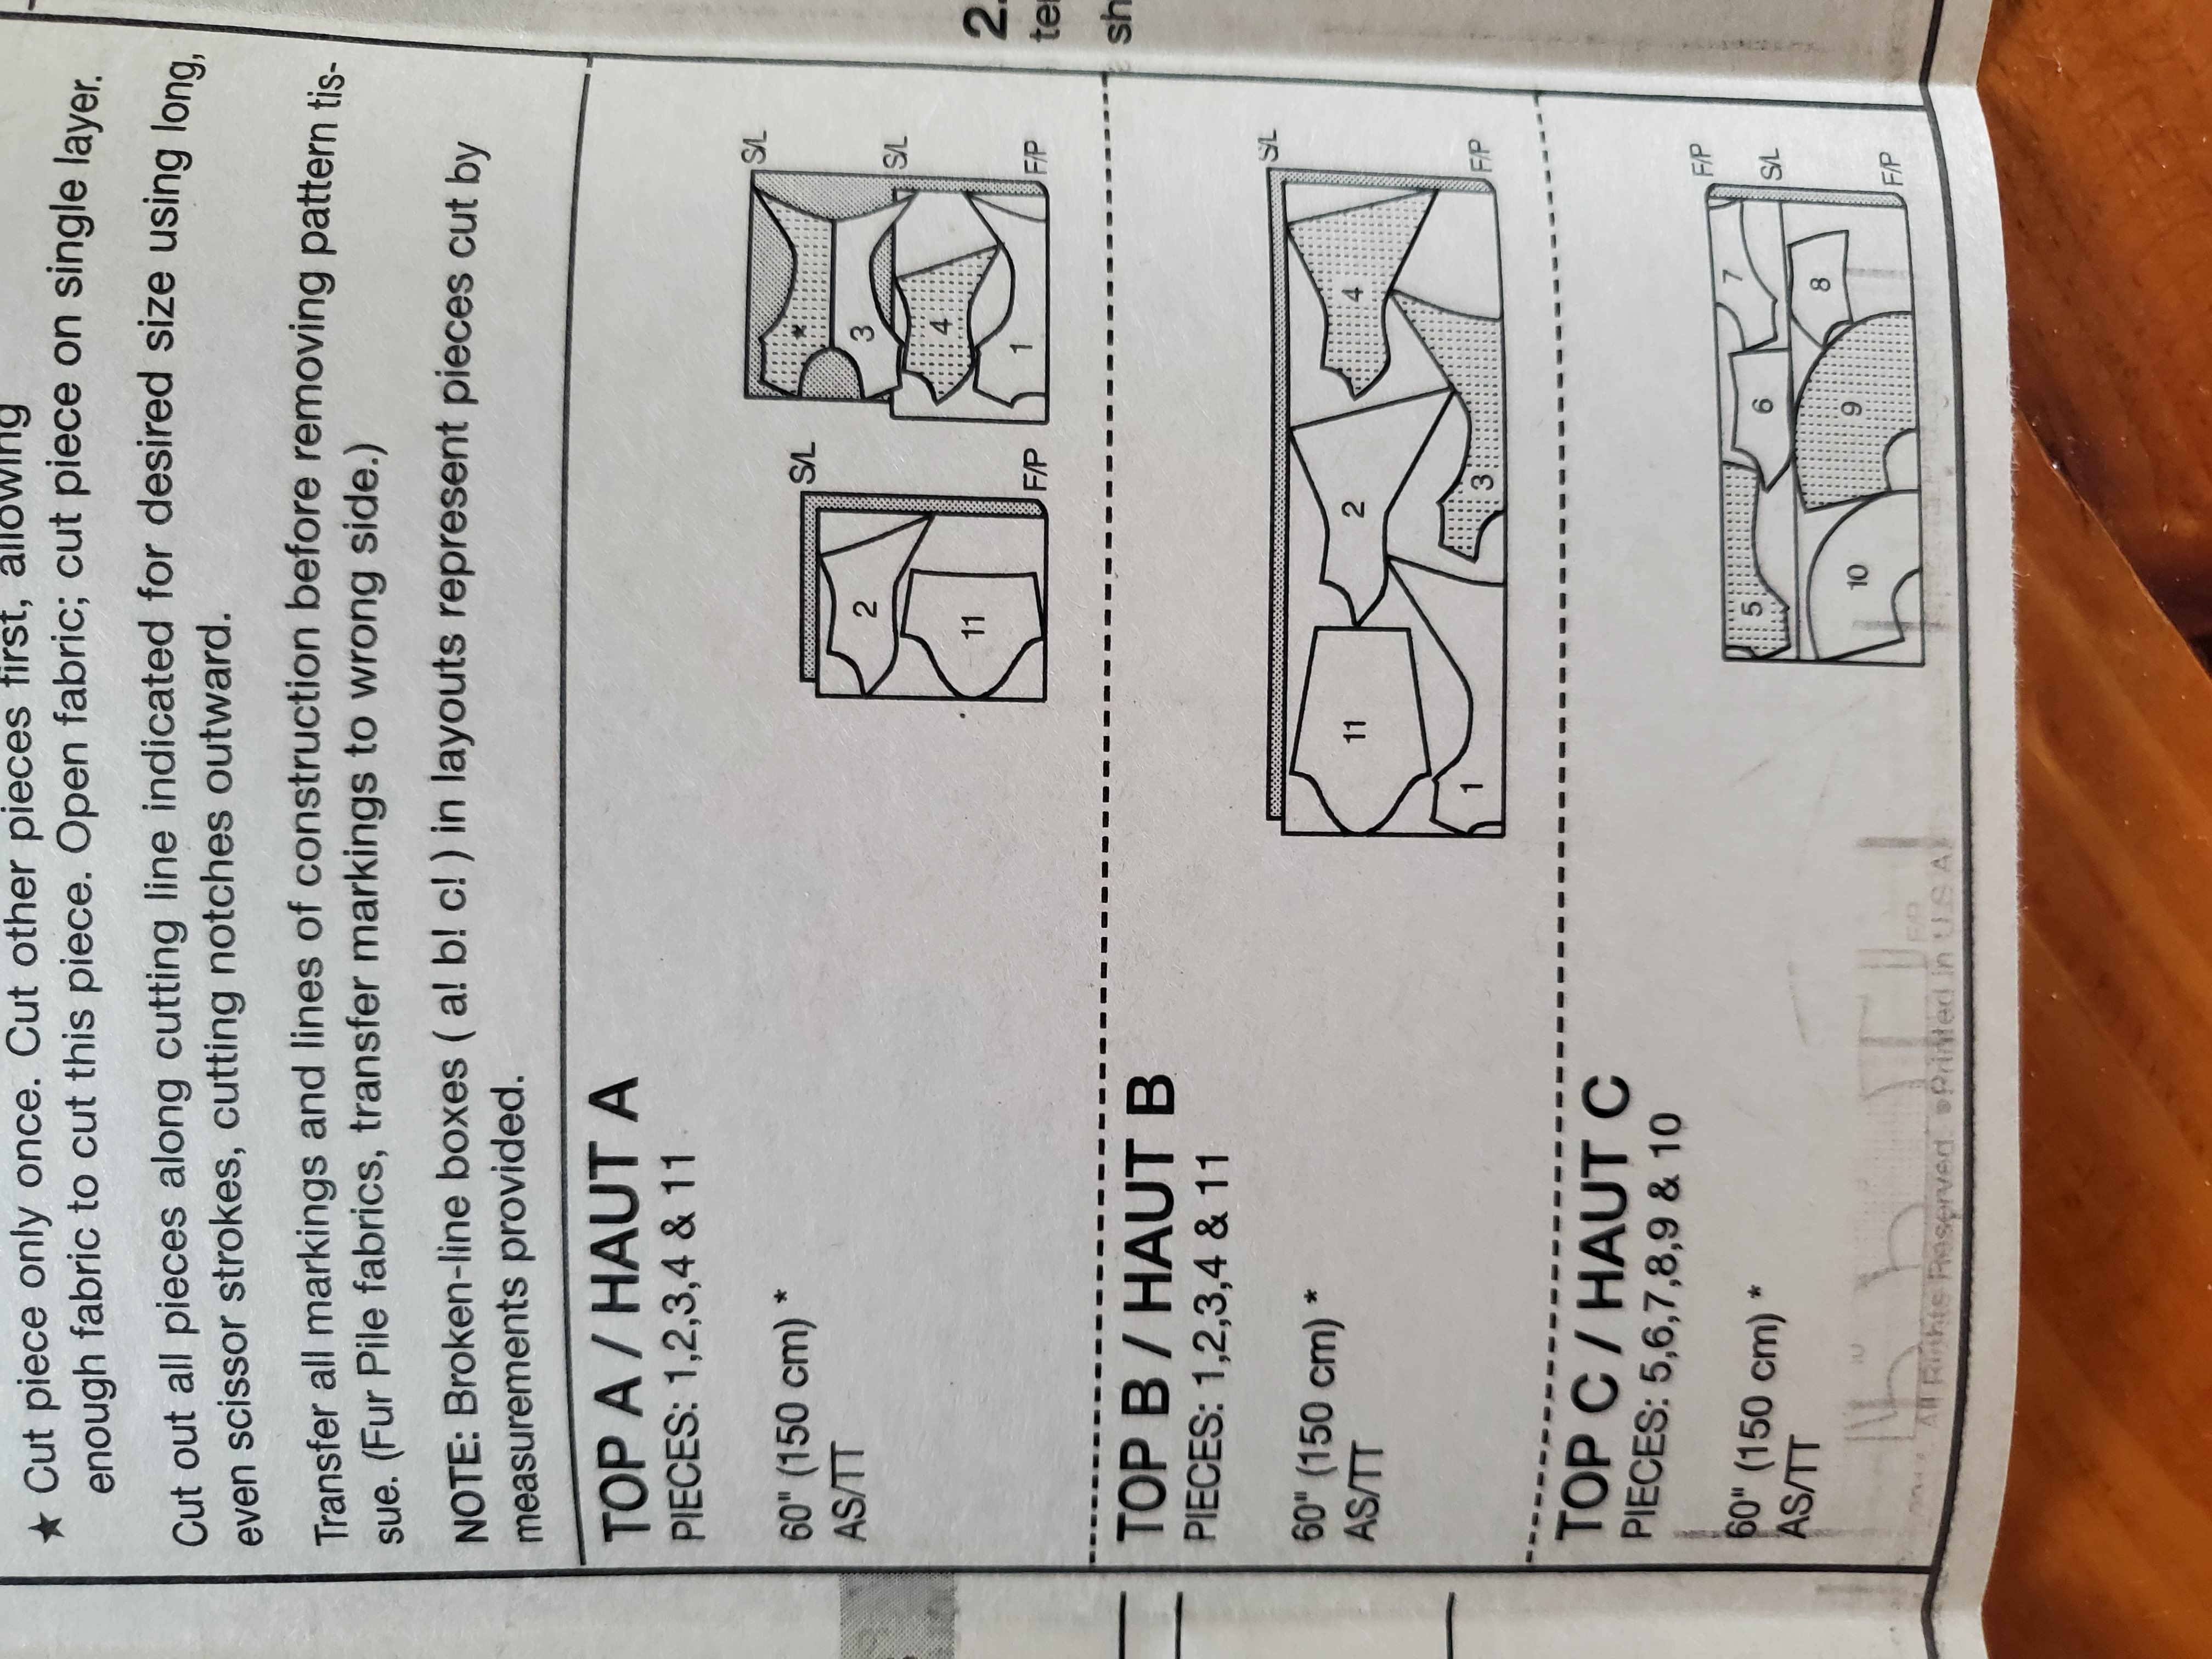
Section 4.3 Fabric Cutting Layouts
And Section 4.3 shows how they would recommend the pattern pieces be placed on the fabric and cut out to conserve the most material, depending on how much fabric you bought, the width of that fabric, and which garment type you are cutting out. The gray box around the edge of the material indicated that the other side is folded; for example, pieces 1, 3, 10, 9, 5, and 7 should be cut on the fold so that when you open it up, those sections are already put together. Top C also indicated that there are two sections of fabric that are folded so that more pieces can comfortably be cut on a fold line. Depending on your measurements, these charts might not work either, so be sure to lay all your pattern pieces out before you start cutting to double check that you have enough fabric to fit every piece.Â
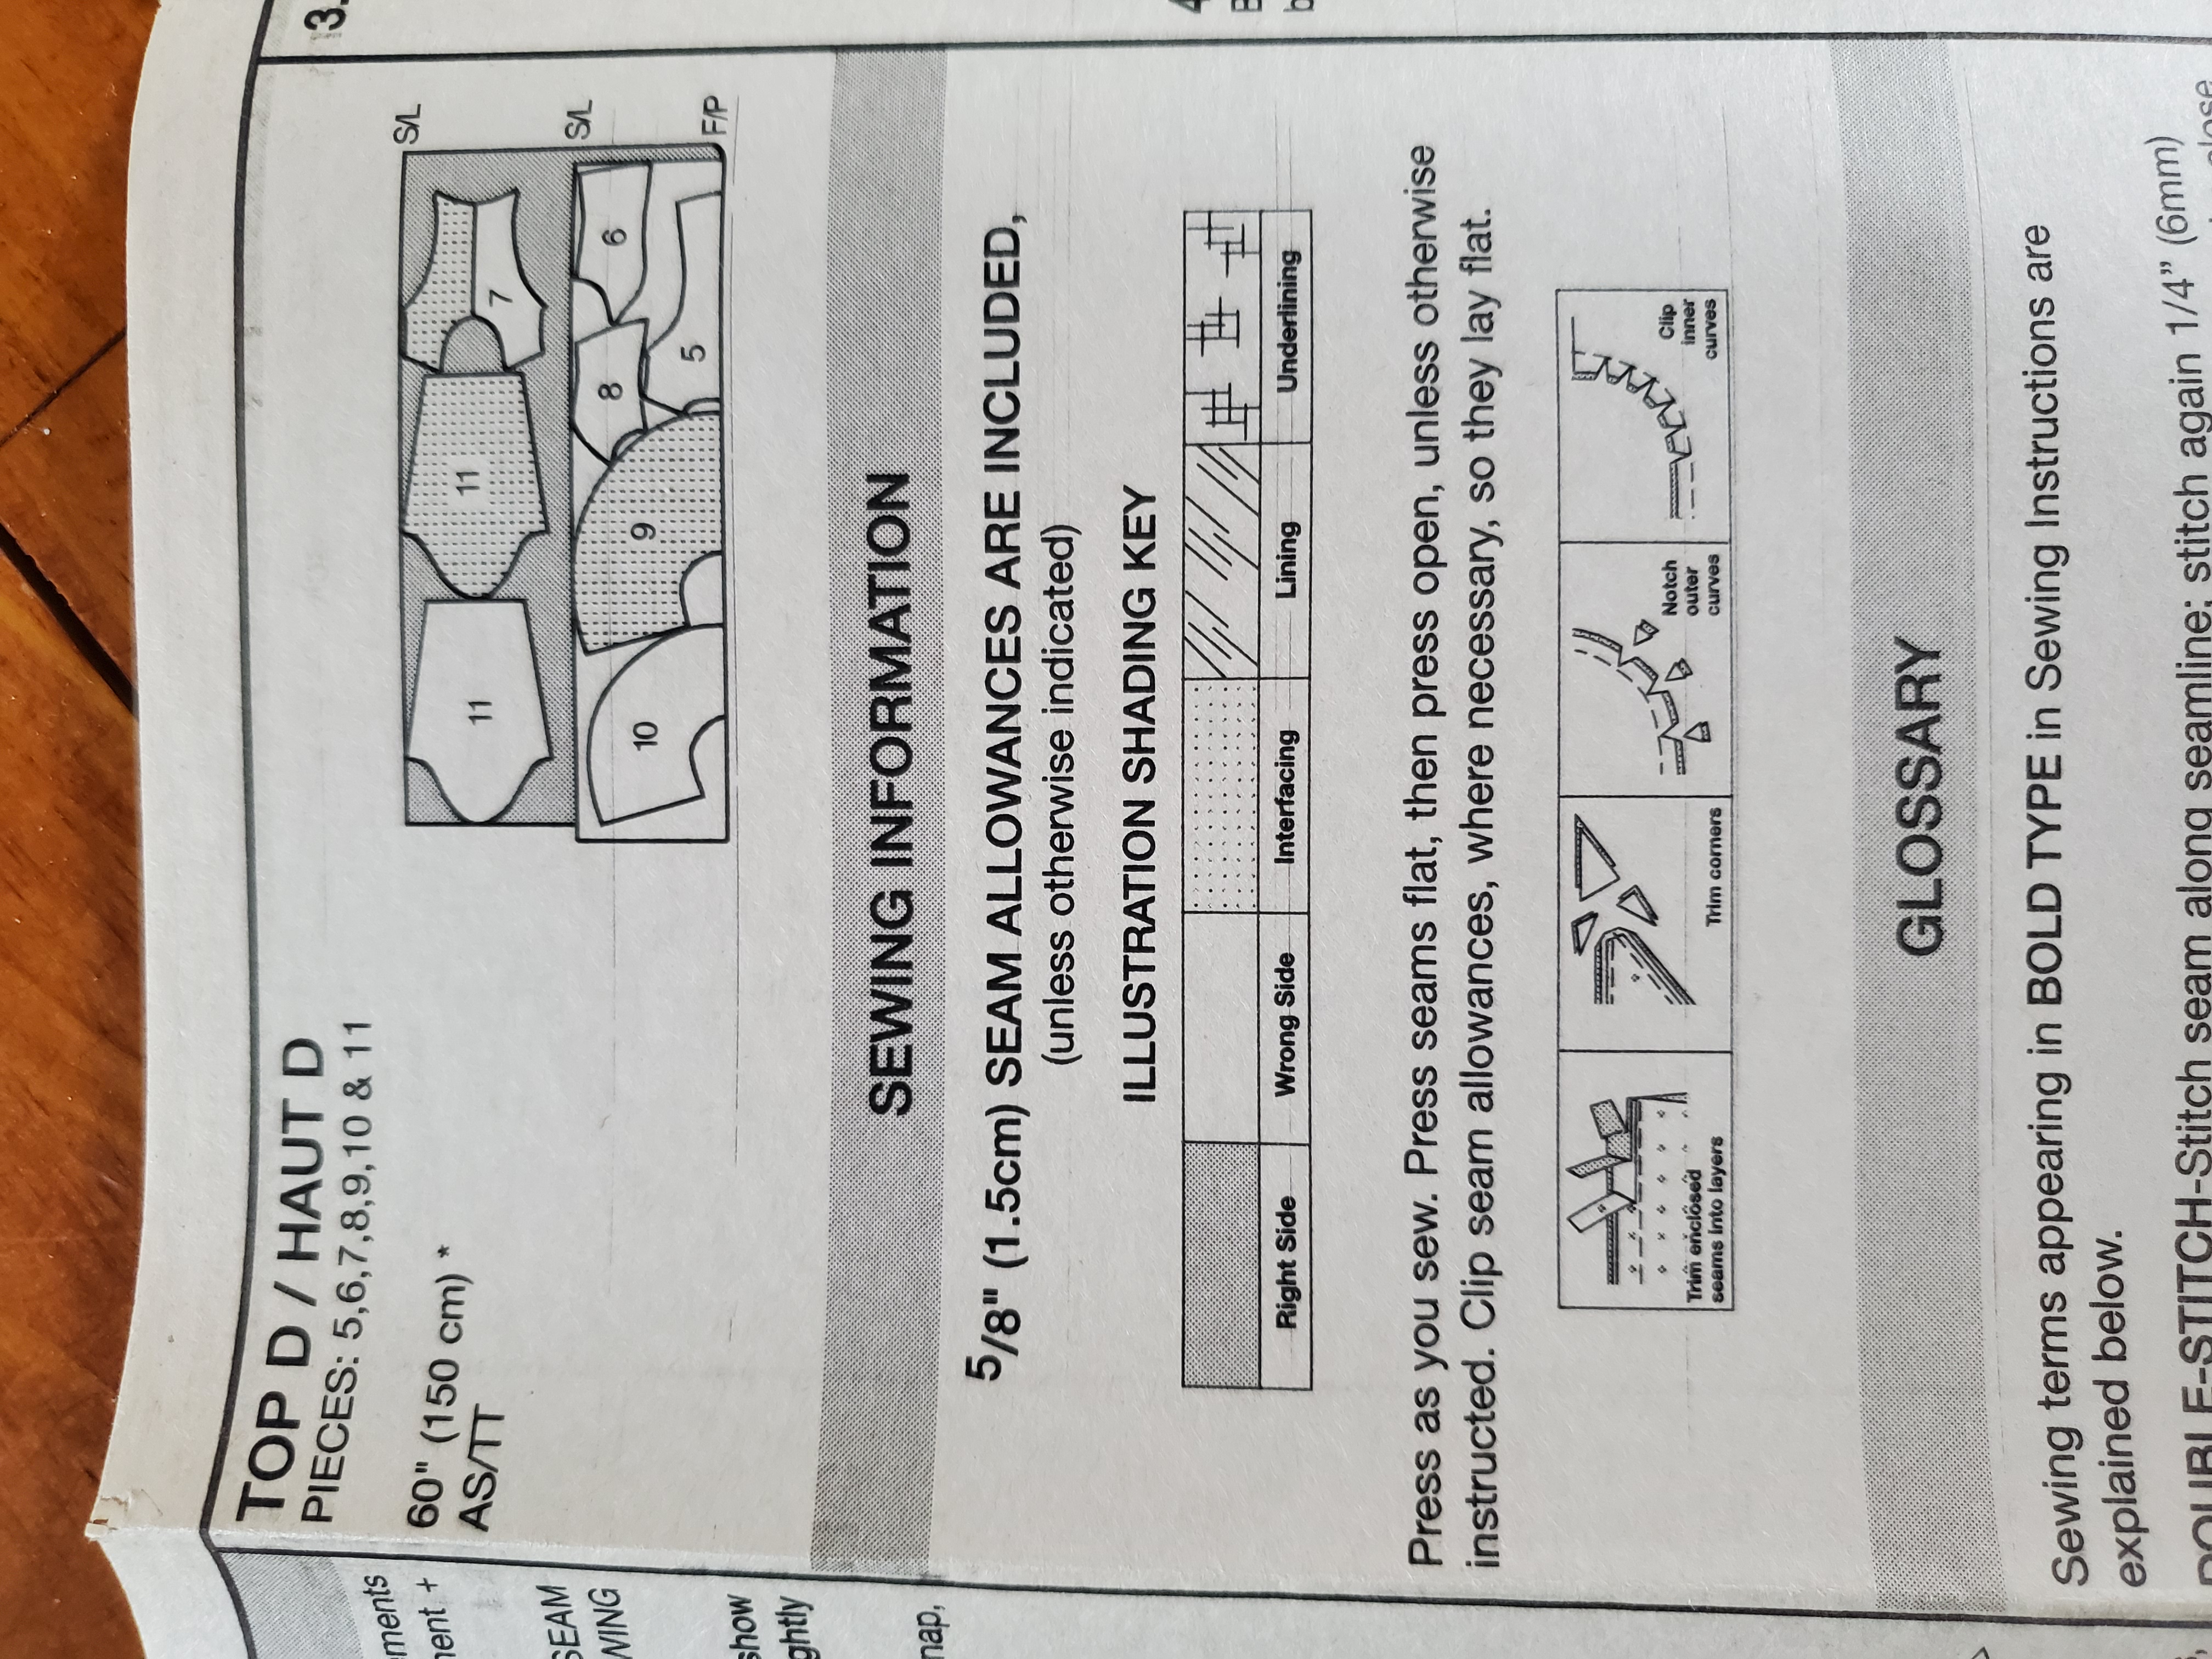
Section 5 Sewing Information
Section 5 informs you of the seam allowance that is included in the pattern. This is the distance you should sew from the edge when stitching the pieces together. There is also another illustration guide specific to the instruction illustrations this time, and more details of some of the more complex instructions that will come up later on in the document.
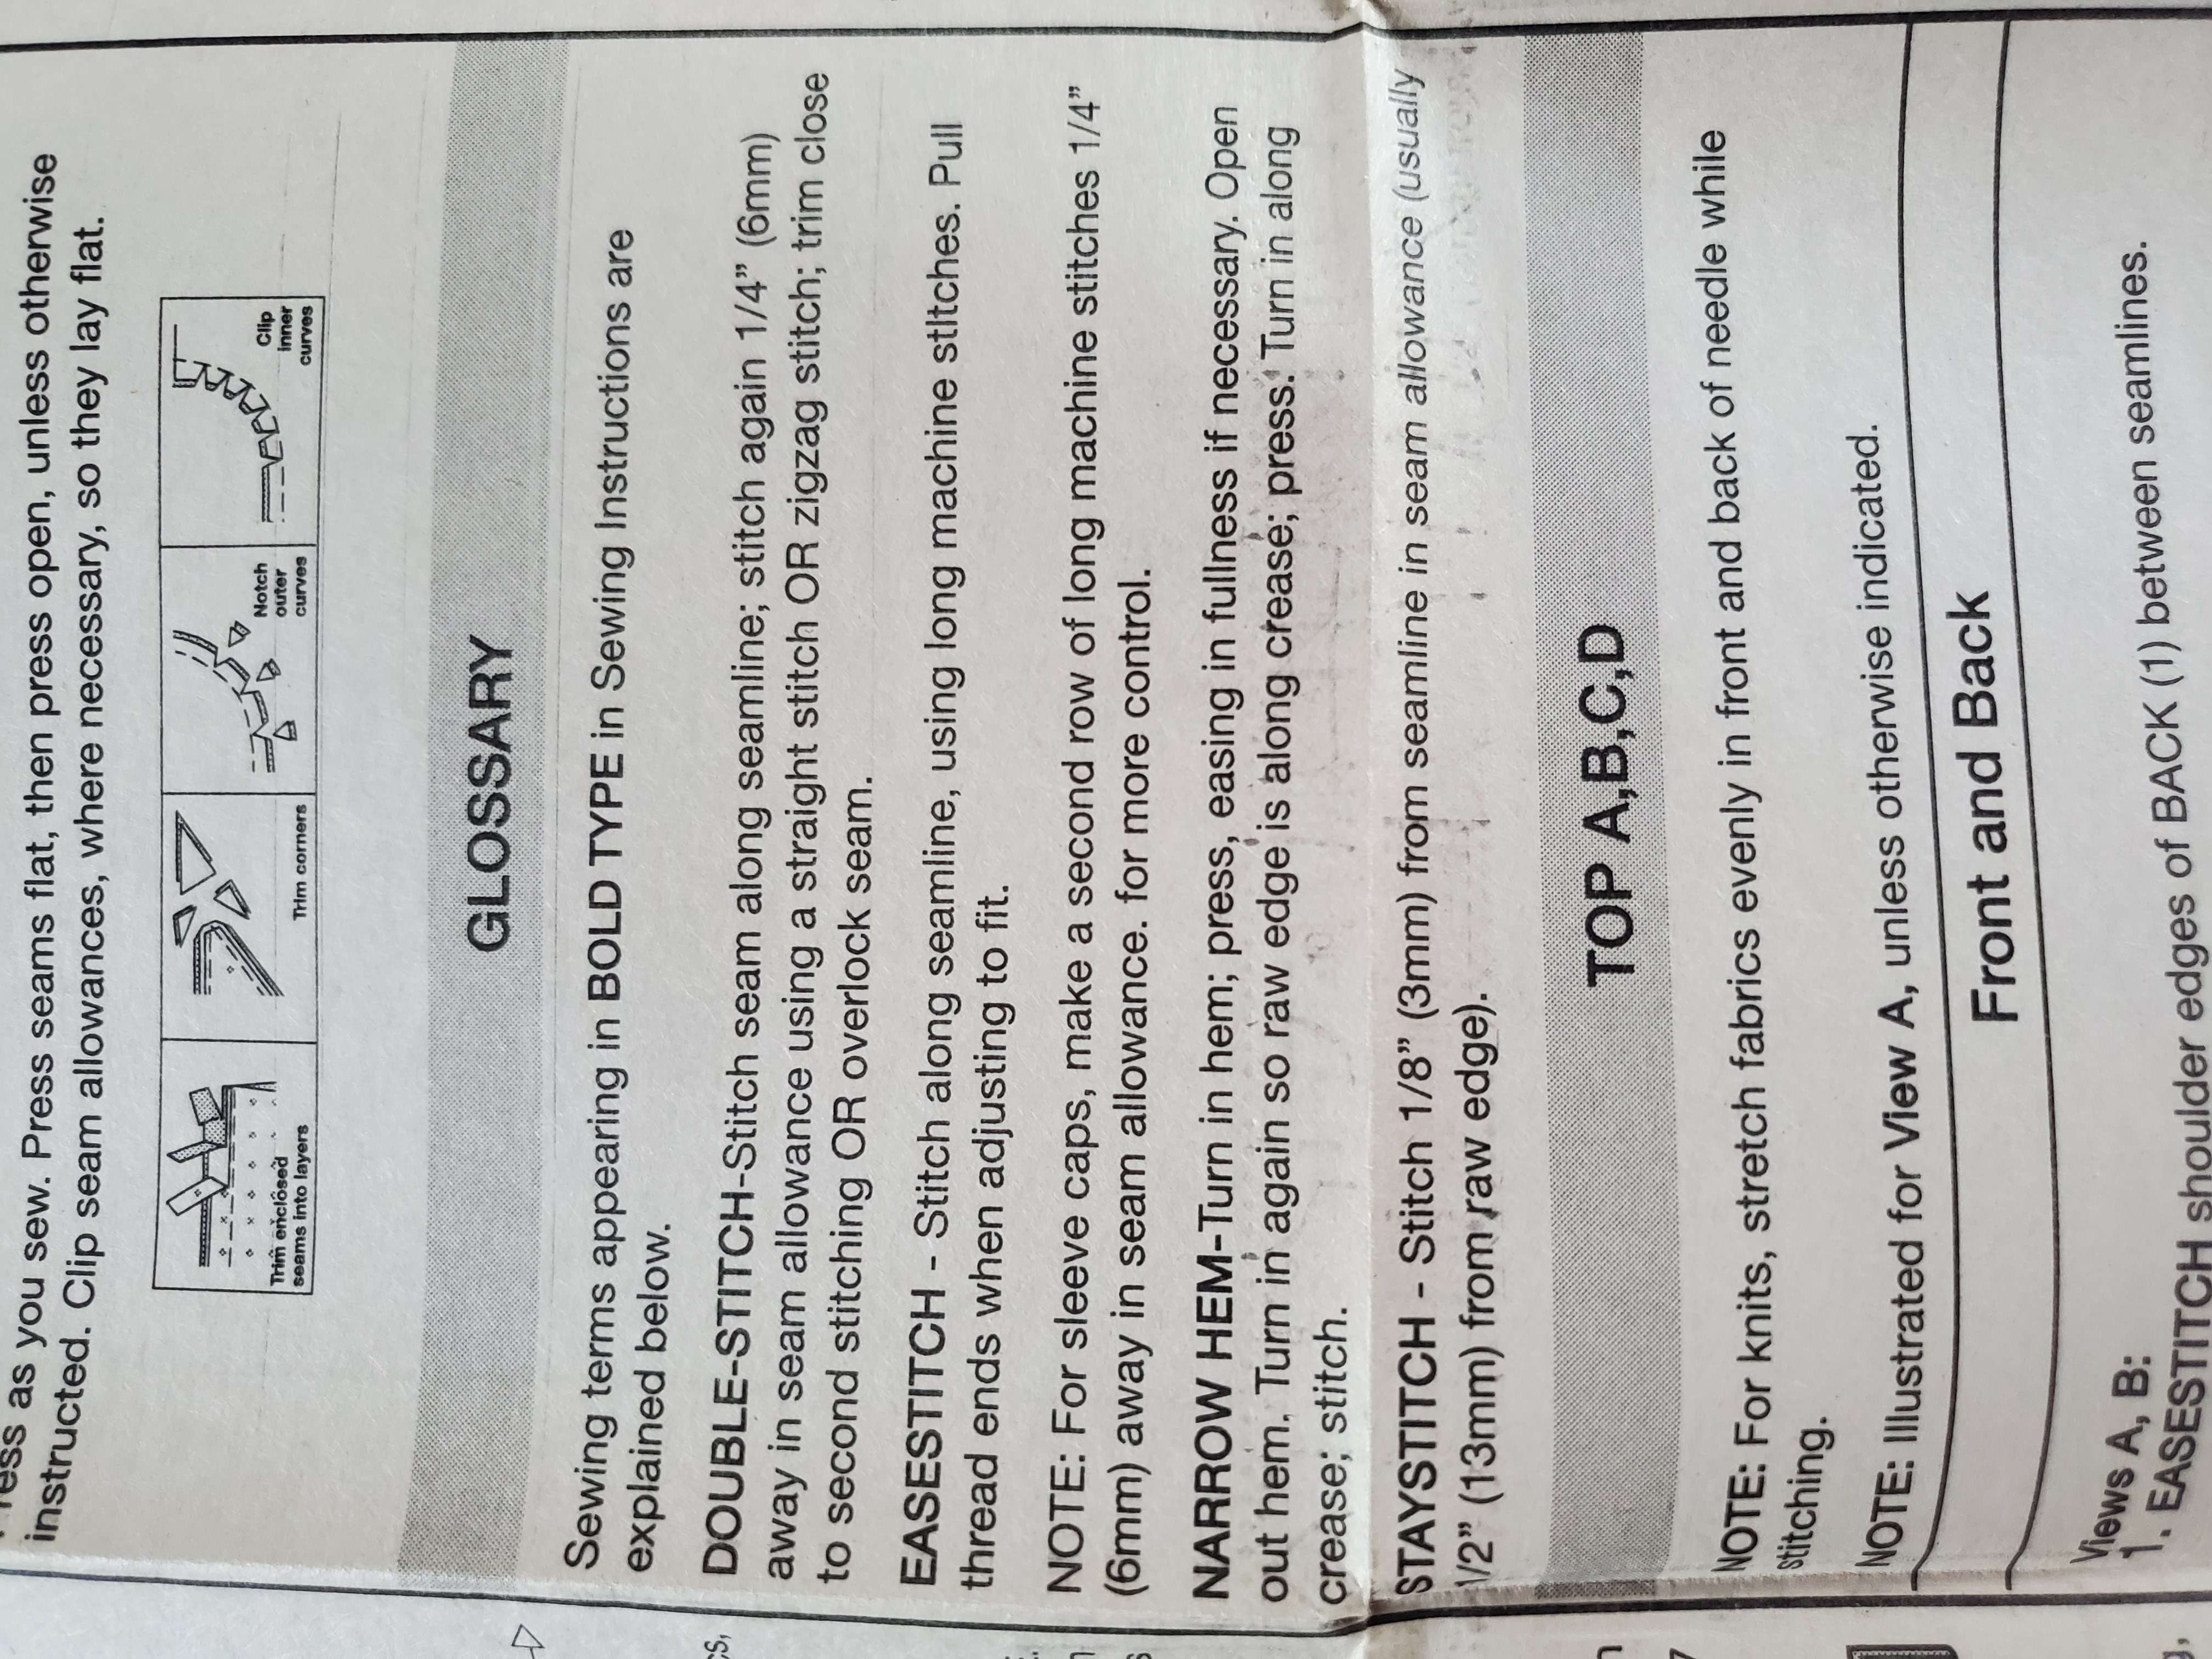
Section 6 and 7 Glossary and Additional Notes
 This is the first section you should check if you came across any terminology that you didn’t understand when reading through the instructions. Generally, these are the terms that are highlighted, bolded, or capitalized to let you know there is a definition readily available. Not every term will be listed, but a quick Google search for the rest should lead you in the right direction. It’ll get easier as you go on your sewing journey to learn and remember what all these words mean.Â
Finally, the last section of the information portion of this pattern is any final notes to keep in mind when you start sewing.Â
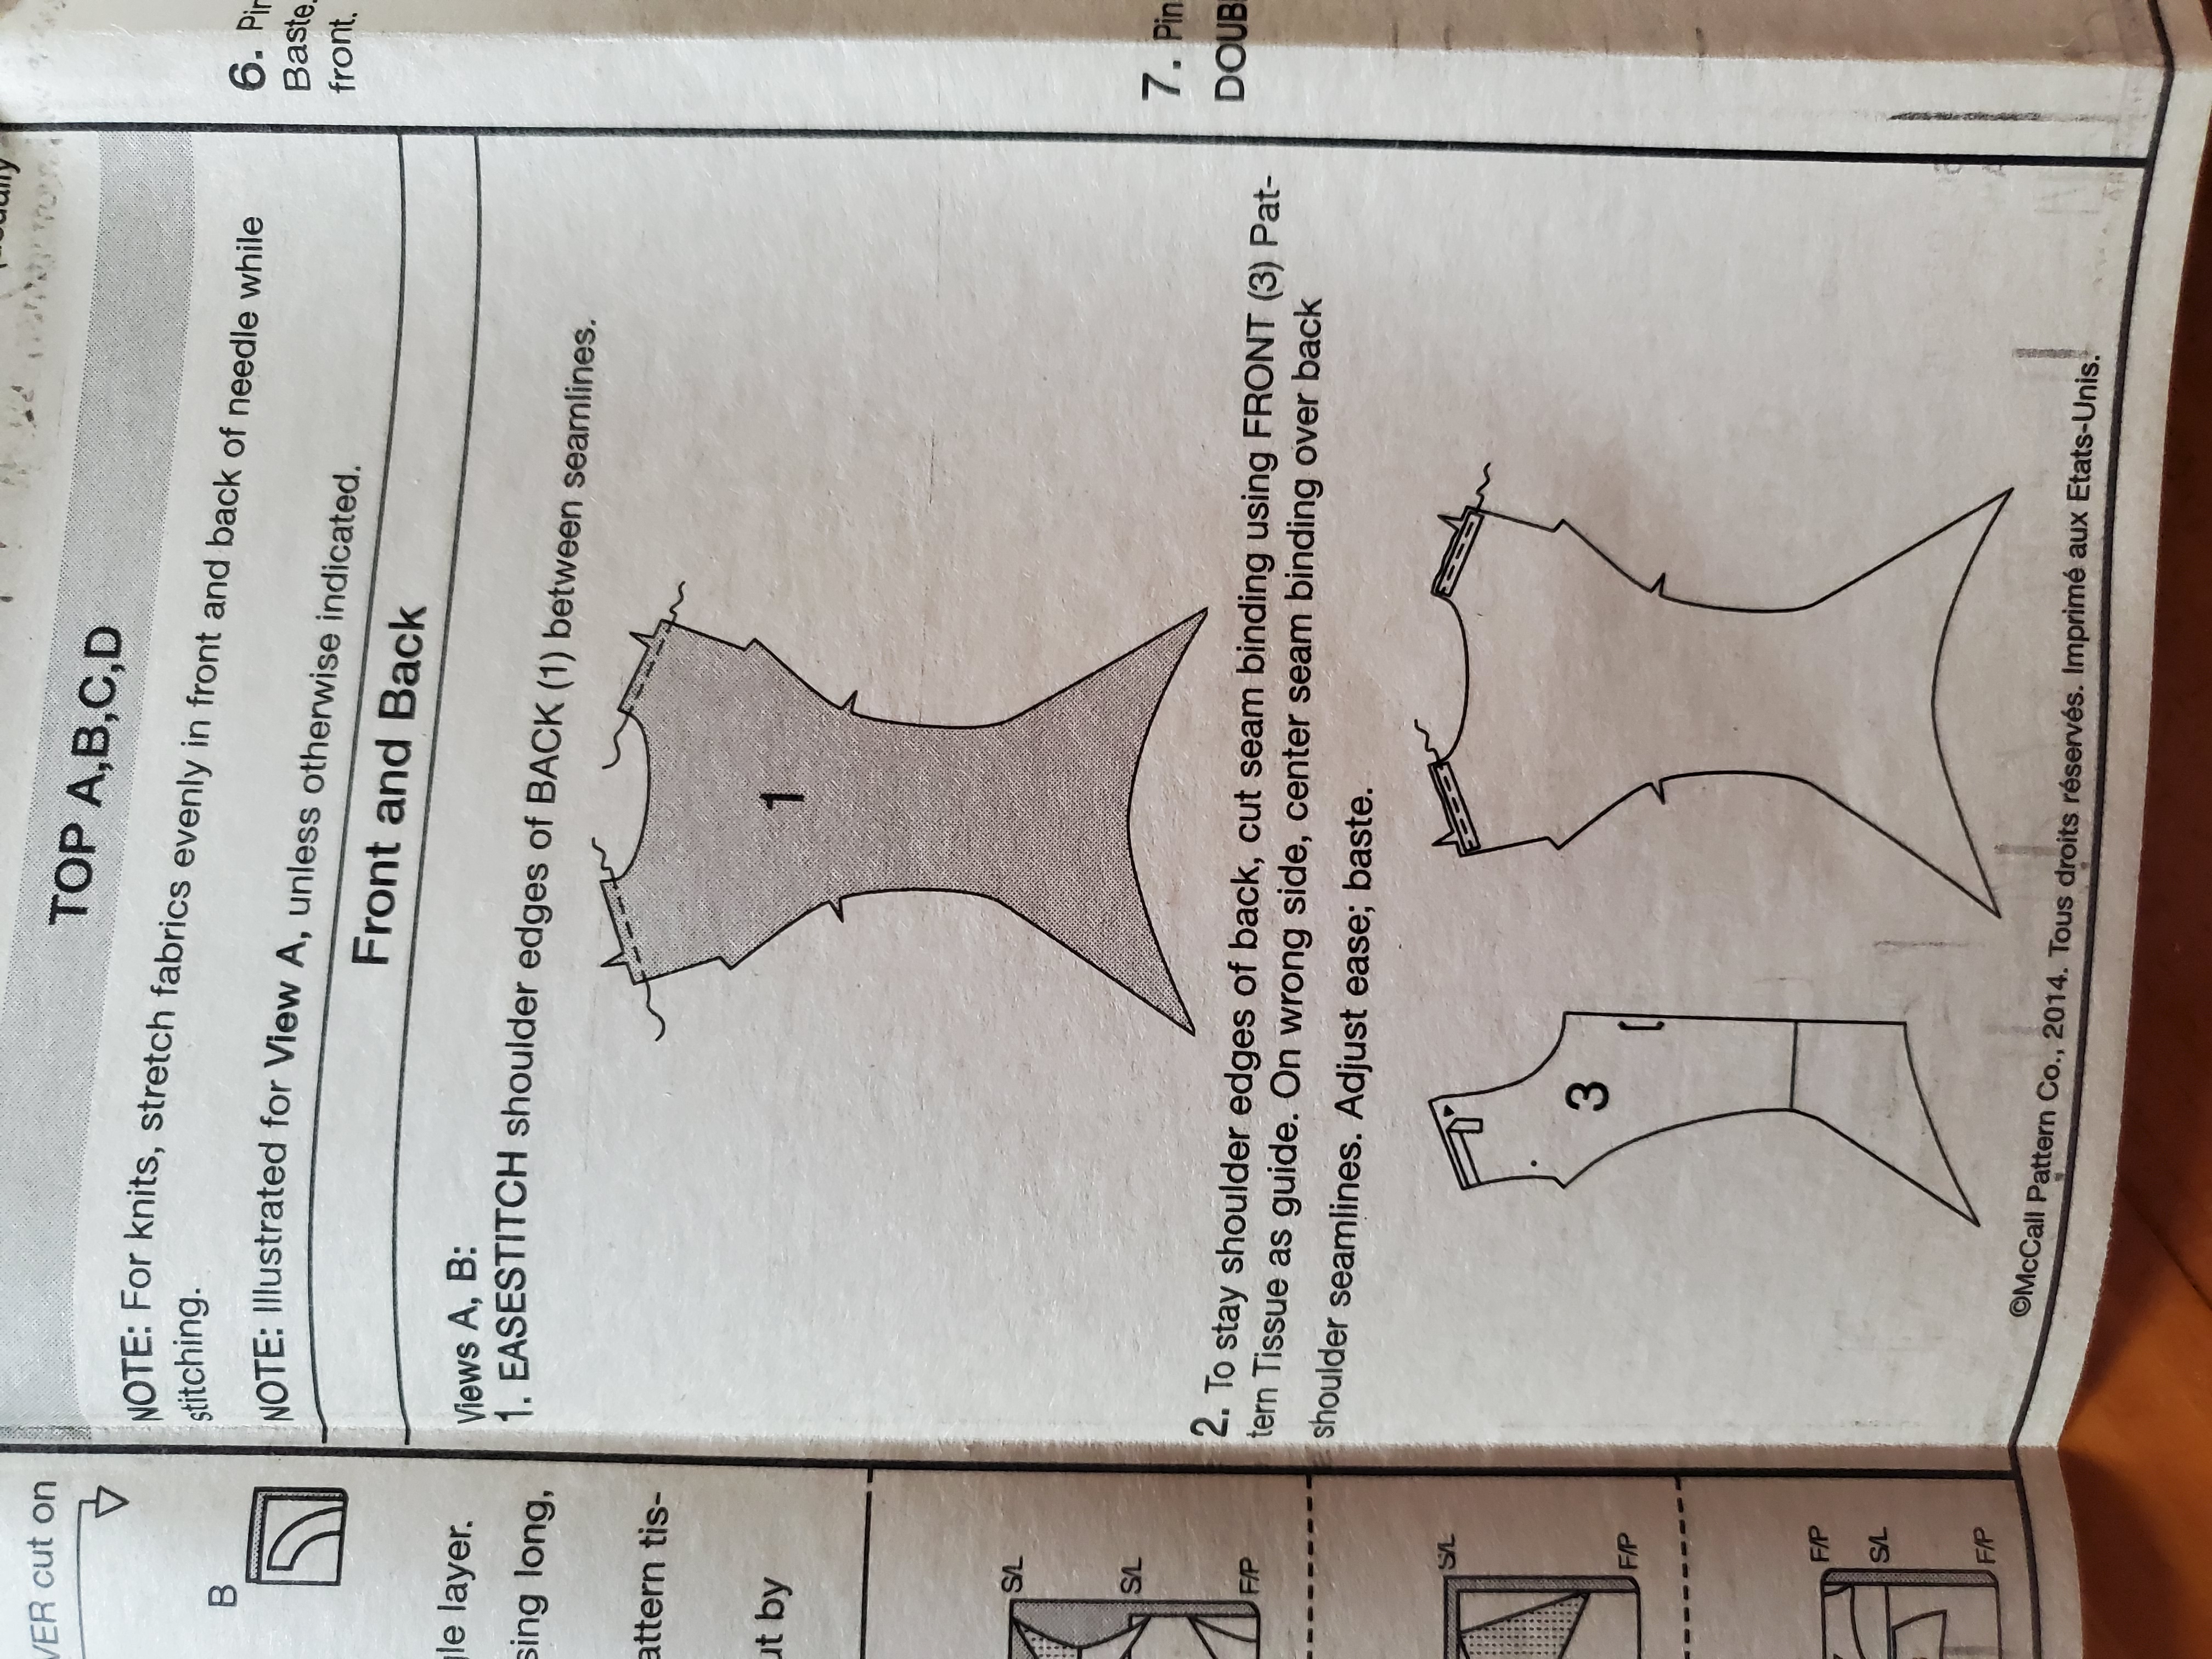
Instructions
 Each step of the instructions will have a simply written direction and a simply drawn illustration. The illustrations will have simple additions that should match the pattern pieces, such as the pattern piece number, notches for lining up the pieces, and a fold line indicator if the piece is folded instead of cut, just to name a few. While simplicity is great in some regards, it can also make it hard to understand what the instructions are trying to tell you. If you come across a sentence or a phrase that doesn’t make sense, for example, adjust ease, Google and YouTube videos will generally have an answer as to the meaning. If it’s still confusing, use the pattern number and the company name to see if anyone’s made a tutorial on this particular pattern you can follow. And as a last resort, take your best guess and continue on. You won’t always be right, but if you pay attention to how your finished garment turned out and what it was supposed to look like, you might just be able to figure out what that step meant, at which point you can either make a new one, go back and fix the mistake, or take your new knowledge onto the next project. Remember, sewing is a journey, and you won’t have all the answers right away. A lot of these hang-ups should be taken care of during the mock-up stage as well; it’s not just for fit adjustments; it’s a trial run of the assembly process. So remember to actually complete each step while doing the mock-up to give your finished garment the best chance of success. Enjoy the process of learning and watch your skills flourish with each new thing you make.Â

Final Note
 At the end of the last step, it isn’t uncommon for the page to list the introductory information once again in a different language to cater to a wider audience. The pattern envelope will also have the information listed in another language, so that’s just something to be aware of when looking at these pages. It simply means that the last step will be somewhere in the middle of the back page instead of at the bottom right hand corner. It takes fewer steps to complete your garment than you might think.

Reading Indie Patterns
Indie patterns are a lot more nuanced when it comes to instructions. A lot come with written instructions, some video tutorials, some come with both, and some don’t come with instructions at all (this is normally free patterns but it’s still something to keep an eye out for). Most indie patterns will have the same or similar information listed on the product listing online that would otherwise be on the physical pattern envelope. Once again, each one will be slightly different in the information as well as where it’s located because each indie pattern maker is different; they have their own preferred processes and their own preferred production look. The same can be said for their patterns.
There are a few different ways indie patterns might create their instructions. For example, all of my patterns have drawn illustrations similar to the commercial patterns. Other indie artists might follow the same format but use photographed imagery in place of illustrations. A good example of this is mood fabrics, as all of their patterns are free and their instructions are written in a blog post style with photographs detailing each step. I believe they’re a great place to start for beginners as well because they have such an amazing collection. Finally, as I mentioned before, some indie artists will simply make a video tutorial for their patterns. There are free patterns and videos you can find on YouTube that you can check out as well to get an idea of what that might entail, especially for simpler projects beginners might be interested in trying, such as making coin purses or pillows.
Because indie patterns don’t have to deal with the same limitations as commercial patterns, they can sometimes be easier to follow because the instructions can be more detailed and thorough, showing each step in detail. But it can also be much worse, because it is up to the individual artist to decide how much detail to include. It’s also possible for anyone to start selling patterns, which is amazing for artists, but it also opens the door to people who might not be quite up to par with pattern making just yet, or even worse, AI patterns that have never actually been made before. This means the pattern could be missing information, the sizing could be off, or the terminology could be wrong. This nuance means it’s important to do your research into the pattern designer, read reviews, and look into their free patterns if they have any for comparison.
What to do if you’re still confused
If you’re still confused, that’s totally understandable! This is a lot of information to be learning all at once. Sometimes skipping a step from sewing instructions is the only way to learn why it’s a step in the first place. When I first started sewing, I skipped confusing steps all the time, and while it almost always made my project worse, it helped me to very quickly visualize what each choice was doing to my garments. It’s also important to take your time and read through all of the information provided on the patterns. It’s really tempting to just skip through and jump right into sewing, but there’s a lot of important information provided that will only make the project easier to complete and better in the end.
With all this new information, you should be well equipped to pick which type of pattern to start with, but don’t be afraid to test the other options as well. One might just surprise you.
Feel free to reach out with any questions, and happy sewing, everyone!